The Brother Hubbard Cookbook: Chocolate Brownies
Brownies – the basic, classic recipe
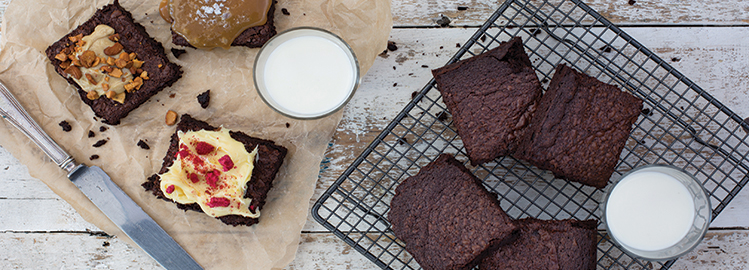
This Valentine’s Day we have some great tips and recipes from our authors that will keep you in the good books (well at least until the next Valentine’s Day rolls around). Chocolate is a must on Valentine’s Day and these Chocolate Brownies from The Brother Hubbard Cookbook are heavenly!
Our brownies have always got a great reaction. One food critic who was in likened eating them to that famous scene in When Harry Met Sally. Much experimenting before we opened helped us get the right outcome, as did a very valuable chat with my dear friend Darragh, being the brownie obsessive that he is.
Brownies are one of those things that are regarded as simple, but beware! In such simplicity lies the risk of getting it catastrophically wrong. Maybe that’s a bit extreme, but in my book (literally!), a cakey brownie is a spoiled brownie (where that happens, see the tips and tricks – I’ve some ideas for a rescue plan). You’re aiming for a reasonably crunchy, hard top and a soft, moist, velvety middle, even practically melting if you so desire.
We do the basic version, and sometimes I think this is the best – it’s just about the brownie and the extreme chocolatey-ness of it. But over time we’ve evolved a number of variations using this basic brownie recipe as the foundation for ever-higher brownie greatness!
As with all recipes, the quality of your ingredients will have a profound impact on the outcome, so be sure to source good-quality chocolate and cocoa in order to score higher, ahem, brownie points with your audience.
MAKES 20–25 BROWNIES
225g chocolate (the closer to 70% cocoa solids, the better)
275g butter, softened, plus extra for greasing
340g caster sugar
4 eggs
75g good-quality cocoa powder
70g plain flour
1 tsp salt
tsp baking powder
For this recipe, we use a 31cm x 21cm Swiss roll tin approximately 4cm deep. This is the standard tray we use for any of the tray-baked recipes in this book. If you don’t have a tray this size, use something as close as possible to those dimensions. A different size will affect the depth of the brownie mix in the tray, which will influence the time it takes to bake the brownie. A deeper brownie will take longer and a shallower one will take less time – see how we judge when a brownie is done in the recipe below and simply apply that judgement to your brownies.
Preheat your oven to 170°C. Brush a 31cm x 21cm baking tray with a little melted butter and press in a rectangle of non-stick baking paper so that it comes a little over the sides of the tray on all sides.
When you melt your chocolate, you want it to be just melted rather than piping hot. We do this in a metal bowl set over a pot of boiling water, making sure the bottom of the bowl doesn’t touch the water, stirring gently from time to time and resisting the temptation to dip a finger in! A quick visit to the microwave will work too – on a medium setting, heat the chocolate for 1 minute, stir, heat again for 1 minute, and so on until the chocolate is fully melted.
While that’s happening, get your butter and sugar into a mixing bowl and cream together until very well combined. A mixer does this perfectly, but so does a wooden spoon and a bit of elbow grease. Next, mix in your eggs two at a time, making sure they are well incorporated before adding the next two. Keep mixing until the egg, sugar and butter become one – there should be no runniness to this but rather a soft, fudgy mass. Add the melted chocolate to the bowl, scraping down the sides to get every last bit of this brown magic into your mix. Mix gently until well combined with the other ingredients – it should look a little like a heavy mousse at this stage.
Now add in your mixed dry ingredients all at once – the cocoa, flour, salt and baking powder. Fold in carefully until everything is well combined into one cohesive mix. Don’t be alarmed if it feels like a stiff enough mix – that’s fine.
Turn this into your lined tray. Using a spatula, spoon or palette knife, spread the mix evenly so that it covers the entire tray (I tend to build it up a little more in each corner). Pop in the oven on the middle shelf and leave to do its thing for 25 minutes or so. You will see it all melt down first and then it will rise a little (it will sink down again once it’s cooled).
Test after 20 minutes and monitor at 5- to 10-minute intervals after that. It could take up to 40 minutes, depending on your oven. Here’s the test to know when the brownies are done: take the tray out of the oven gently, closing the door immediately to maintain the heat. Give the tray a little shake. There should be a noticeable wobble in the middle of the brownie – a wobble as opposed to outright runniness. The wobbly bit should just be around the very centre. If it’s too wobbly, pop it back in the oven and check it again after 5–10 minutes, depending on how far away from the perfect wobble you felt it was!
Once you’re happy with your brownie and its wobbliness, take it out of the oven and let it cool on a wire rack. It can’t be cut until it’s thoroughly cooled or it will just be a mess (I learned this the hard, delicious way). As these are very rich, we recommend cutting them into small 5cm squares.
TIPS AND TRICKS
The brownie holds up well – if you leave it out at room temperature, covered, it will last for 2–3 days in a near-perfect state (sorry, there’s no excuse to eat it all at once!). This brownie also freezes remarkably well if put in a sealed container.
If you end up overcooking your brownie, it will still be delicious but it will have more of a cakey quality than it should. I suppose this is why it’s not called chocolate cake, but a lot of brownie-bakers out there don’t seem to realise this. But if you do overdo it, just be sure to serve it with some whipped cream or ice cream and perhaps some melted chocolate ganache over it too. Break it up into a bowl, mix 150g melted chocolate with 75ml cream and pour this over the ‘cake’, gently tossing everything together with a spatula or wooden spoon and serving in a bowl with ice cream or whipped cream. A raspberry jam sauce (just heat some jam with a splash of water) and whipped cream would also be a delicious way to rescue the brownie. Or if you don’t want to go to all that trouble, serving it gently warmed will also help reduce the dry-cakey experience.
If you overbake your brownie, the most important thing is to remember that the next time you bake them, leave it for less time. Cooking can be quite iterative as you get to know your recipes, your equipment and your ingredients. Every time we cook something we learn something for the next time, so feel free to write some notes in the margin beside this recipe to make sure you don’t make the same mistake twice!
The Brother Hubbard Cookbook is available on our website, Eason, Amazon and in all good bookstores.
Keep up to date with Brother Hubbard on Facebook, Instagram, Twitter and on their website.
Follow us at @Gill_Books on Twitter, gillbooks on Instagram and like us on Facebook to keep up to date with our latest news and events.
We're Hiring - Editor
© 2026 M.H. Gill & Co. Unlimited Company